By Nick Breen
We strive to make all of Khan Academy’s new features & experiences easy to understand and valuable to our users. Watching our users interact and explore new features, which is often called user testing, helps us identify which designs & flows are non-intuitive and could use some improvement. Doing user testing as early as possible is useful because changing designs is significantly easier before the design is passed to the product team to implement and build.
In this blog post, you and I will explore how Khan Academy uses prototypes in our user testing and hopefully it will be a great primer for you to start prototyping!
Why do we prototype?
Prototyping allows our product teams to create a more immersive, often called higher fidelity, product walkthrough experience. Flipping through a set of static design mockups would be less interactive and an example of a lower fidelity experience. Both options are useful and can lead to valuable feedback. Lower fidelity user testing is done first and high fidelity prototypes are utilized later to provide a more immersive, less instructor guided interaction with the feature.
A prototype’s main purpose is to enable our users to interact with new designs which gives us feedback to improve our designs. Each prototype is only seen by the participants of our user test groups and the prototype has a set lifespan since it’s retired after user testing. This means our prototypes can have a much lower coding standards quality bar than anything we create for KhanAcademy.org, which is commonly referred to as our production environment. This is a good thing, because we can take advantage of different tools to build faster.
What tools do we use and why did we pick them?
During the prototyping phase of a project the designs will regularly change thanks to all this great user feedback. Our goal with any prototyping is creating and editing new screens as quickly as possible because designs will be tweaked after every user interview. Instead of writing time-intensive, stable code and perfecting CSS styling on all browsers we want to utilize tools that help us create new features quickly with comparable levels of fidelity. There is a large list of prototyping tools that serve different fidelity needs, ranging from piecing together screenshots (ex: Marvel) to writing stateful prototypes that can integrate with backends (ex: Framer).
Our team has chosen Framer to do our prototyping work for a few reasons:
- There are many folks at Khan Academy with Framer expertise
- Framer has wonderful integration with Sketch, which is a design tool our friends in design use
- Framer allows developers to play to their strengths (writing code) and has a lot of helpers to create functionality quickly.

Below we’ll offer some great resources to getting started with Framer, but for now we’re going to keep exploring the philosophy of prototyping.
What should I prototype?
‘Do as little positioning and styling in the prototype as possible’ is a rule of thumb we’ve learned on our prototyping adventures. All the styles and positioning should be done in the design mockups instead of in our prototype’s code. One of Framer’s advantages is the ability to easily import Sketch files. This feature instantly imports the exact pixel-perfect position for all the elements, which are also styled exactly as they appear in the designs.
On the flip side, we can and should do all state changes in our prototype. The most common state changes in a prototype are:
- changing text on a page
- swapping images to denote a correct or incorrect selection
- showing new content when clicking on a link (example: show me a hint for this question)
One of our most interesting issues we solved when learning how to prototype was creating a repeatable and reliable way to change text in your prototype. Our solution had two parts, first we swap the layer containing the text with a new layer which has the new text. Let’s pretend that second layer has less text on it so it’s shorter. The second step was to reposition and shrink or grow all the layers below the swapped layer and the parent layers. Since our swapped layer is shorter we’d reposition those layers higher and shrink them. For a in depth exploration into this problem please see appendix A.
What should I NOT prototype?
To reiterate, Framer should be used when the prototype needs state-management, like tracking points, or dynamically changing content.
We should not be doing substantial design work (Pixel pushing, style updates, etc) in Framer. Remember our mantra: Do design work in mockups instead of in code.
There are easier and faster tools if we just want to simply stitch design mockups together (our friends in design prefer Principle). Tabitha, one of our friends on the design team, said it best: “developer’s should only create stateful prototypes, everything else can be done faster and easier without custom code.”
How do I start prototyping with Framer?
- Framer introduction doc and video
- Download the free trial of Framer and Sketch
- How to import sketch documents
I have questions
Great! Prototyping is all about moving fast and you might find yourself in a undiscovered land! The best place to ask questions is the Framer Facebook group or Stack Overflow FramerJS tag.
Closing thoughts
Give prototyping a shot and get your designs in front of users!
Special Thanks to Emily & Bryan for their help on this article.
Appendix A: How do I update sections & text fields that may grow dynamically?
As we noted above, one of Framer’s advantages is the ability to directly import sketch designs. The imported designs are pixel-perfect and each sketch layer is absolute positioned based on the layer’s x and y coordinates. However, this creates an issue when the prototype is required to dynamically change content and the layer grows or shrinks vertically.
Let’s explain this using an example. We have a prototype that is a question and answer prototype. The main page looks like:
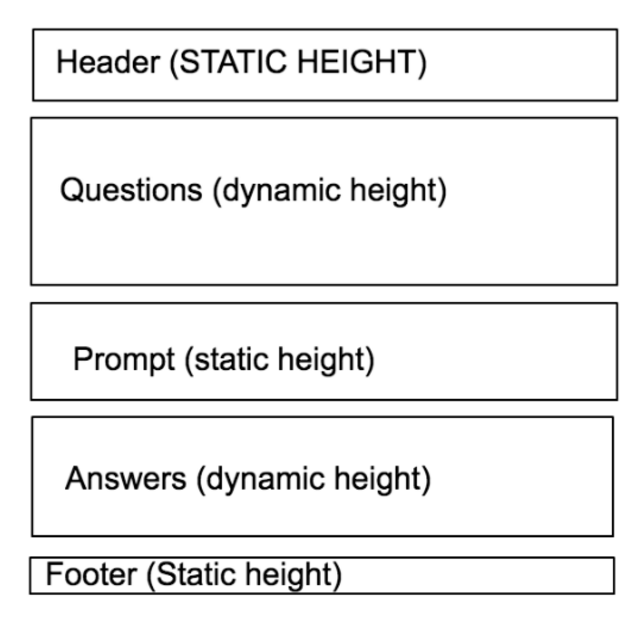
We want to substitute the question text because each question is different. Also, let’s pretend our new question text is substantially shorter. Once we swap the text, they’ll be a new large space between the question text and answer prompt, which doesn’t match our designs. This makes the prototype’s user experience less authentic, which is bad.
We want our prototype’s user experience to be as authentic as possible. What do we do? We brainstormed and investigated three possible solutions. We’ve outlined them in great detail on Stack Overflow. We’ll now talk about our solution, which is to swap the layer and reposition all the layers below.
We wrote some code to:
- Use TextLayer to create a new layer with the new question text
- Measure the size difference between the original sketch question text layer and our new TextLayer
- Resize the parent layers based on the difference calculated in #2
- Remove the original sketch layer
- Insert the new TextLayer in the same x and y coordinates as the original sketch layer
For more information on TextLayer, please take a look at it’s repository. Please note, the function / method I could not get convertToTextLayer to work properly.
Appendix B: Performance in Framer Studio
If your Framer prototype starts getting above ~1200-1500 lines of code, you’ll likely run into performance issues with text-editing. If that happens, try this:
Head over to Terminal, and start a server on your local machine:
cd myPrototype.framer/ python -m SimpleHTTPServer
Open up a browser window and go to localhost:8000 or whatever URL you got in Terminal. Use a different text editor (like Sublime or Atom or whatever else you have that’s performant) and fire away!
Appendix C: Tips for creating a good Sketch document for importing into Framer
- The layers/groups should be organized as they are displayed starting from the top going down
- Unique names for every template and layer are helpful when importing the layers into Framer
- Every growable text area (description, each answer, etc) should have it’s own direct parent group